Introduction: A Clean Bottle Is Not the Same as a Maintained Bottle
Reusable water bottles are designed for longevity. Stainless steel, Tritan plastic, and insulated vacuum structures are engineered to withstand daily use. Yet durability does not eliminate the need for maintenance.
Most users focus on rinsing. Few understand maintenance as a system.
A poorly maintained bottle can develop:
- Persistent odors
- Bacterial biofilm
- Mineral buildup
- Surface discoloration
- Reduced insulation performance
Cleaning is about hygiene.
Maintenance is about performance and lifespan.
This guide explains the tools, methods, and preventive strategies required to keep reusable water bottles functioning at peak condition for years.
1. Understanding How Bottles Become Contaminated
Before discussing tools, it is critical to understand the underlying causes of contamination and wear.
1.1 Biofilm Formation
Biofilm is a thin, sticky layer formed by bacteria in moist environments. It develops gradually when bottles are not fully dried or when residue from beverages remains inside.
Straws, silicone seals, and lid crevices are common biofilm zones.
Biofilm is not always visible. It can exist even when the bottle looks clean.
1.2 Odor Development
Unpleasant smells typically result from:
- Sugary drink residue
- Protein shakes
- Tea or coffee oils
- Trapped moisture
Odor often originates from silicone components rather than the stainless steel body.
1.3 Mineral Deposits
Hard water leaves calcium and magnesium residue. Over time, this appears as cloudy white film or rough interior texture.
This is not rust. It is mineral scaling.
1.4 Surface Wear and Micro-Scratches
Improper cleaning tools, such as metal brushes or abrasive pads, create micro-scratches that:
- Trap residue
- Reduce surface smoothness
- Increase long-term staining risk
Prevention is more effective than repair.
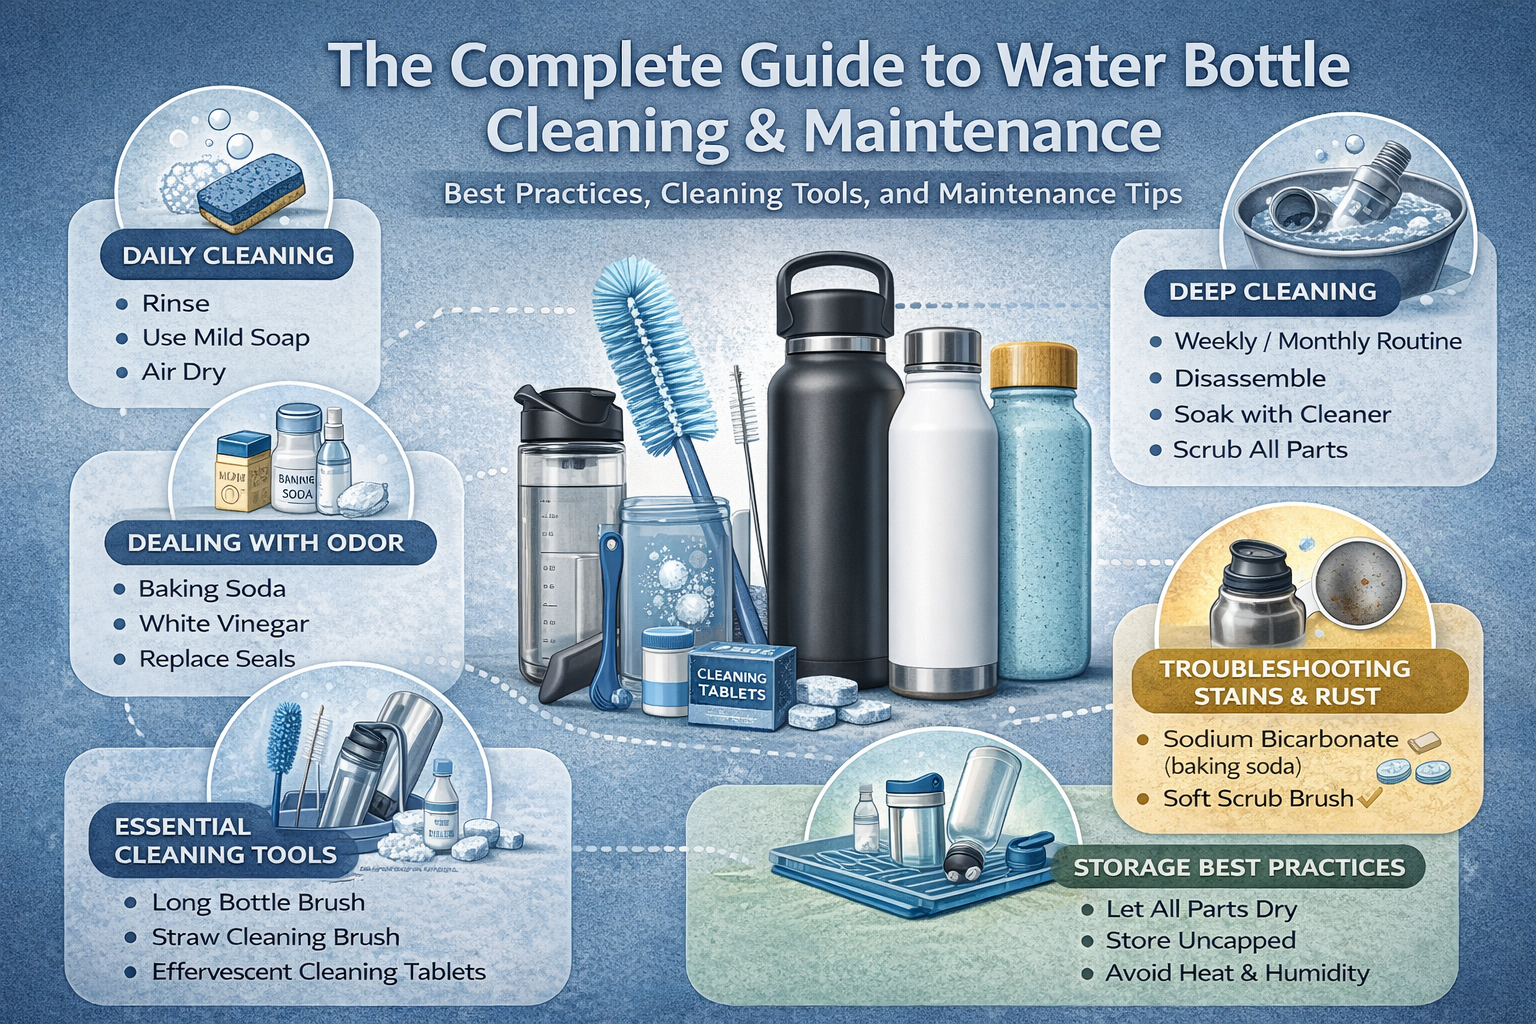
2. Essential Cleaning Tools for Reusable Bottles
Effective maintenance requires specialized tools. Standard kitchen sponges are insufficient for deep cleaning.
2.1 Long-Handle Bottle Brush
A bottle brush is the primary interior cleaning tool.
Ideal features:
- Soft nylon bristles
- Flexible or semi-rigid shaft
- Length sufficient to reach bottom
- Non-metal core to avoid scratching
Bottle brushes are critical for narrow-mouth and insulated designs.
2.2 Straw Brushes and Detail Brushes
Straw-equipped bottles require thin, flexible brushes capable of reaching interior tubing.
Detail brushes are necessary for:
- Lid threading
- Valve openings
- Flip-top mechanisms
- Silicone seal grooves
These areas accumulate moisture and residue faster than the main body.
2.3 Cleaning Tablets
Effervescent cleaning tablets dissolve in warm water and break down:
- Mineral deposits
- Stains
- Odor-causing residue
They are ideal for monthly deep cleaning or after heavy use.
2.4 Natural Cleaning Agents
Two widely used natural agents include:
Baking Soda
Acts as a gentle abrasive and odor neutralizer.
White Vinegar
Mild acid effective for dissolving mineral deposits and deodorizing.
These are safe alternatives when used in moderate concentrations.
2.5 Drying Rack or Airflow Stand
Drying is often overlooked. Moisture retention accelerates bacterial growth.
Best practice:
- Store bottles uncapped
- Invert on drying rack
- Ensure lid components dry separately
Air circulation is essential.
3. Daily Cleaning Protocol
For bottles used only for water:
- Rinse with warm water after use
- Add a few drops of mild dish soap
- Use bottle brush to scrub interior
- Rinse thoroughly
- Air dry without cap
Total time: 1–2 minutes.
For bottles used with flavored or sweet drinks, cleaning should occur immediately after consumption.
4. Weekly Deep Cleaning Routine
Once per week:
- Disassemble all removable parts
- Soak components in warm soapy water
- Scrub interior with bottle brush
- Clean straws and seals with detail brushes
- Rinse thoroughly
- Air dry completely
This prevents long-term buildup.
5. Monthly Intensive Maintenance
For long-term hygiene:
- Fill bottle with warm water
- Add baking soda or cleaning tablet
- Let sit 20–40 minutes
- Scrub thoroughly
- Rinse and dry
This routine helps eliminate hidden buildup and refresh interior surfaces.
6. Managing Odor Issues
Odor management requires identifying the source.
6.1 Mild Odor
Solution:
- 1 tablespoon baking soda
- Warm water
- Soak 30 minutes
Rinse and dry.
6.2 Persistent Odor
Solution:
- Equal parts white vinegar and warm water
- Soak 20–30 minutes
- Rinse thoroughly
Allow extended drying time.
6.3 Silicone Seal Odor
Remove seal ring.
Soak separately in baking soda solution.
If odor persists after repeated cleaning, replacement is recommended.
Silicone absorbs scent over time. Replacement is normal maintenance.
7. Addressing Rust and Staining
True stainless steel rust is rare under normal use.
7.1 Surface Rust Spots
Often caused by:
- External metal particle contamination
- Exposure to saltwater
Remove with baking soda paste and soft cloth.
7.2 Tea and Coffee Stains
Use warm water and baking soda scrub.
Avoid metal scouring pads.
7.3 Discoloration
Rainbow-like interior coloration in stainless steel is heat oxidation, not contamination.
It does not impact safety.
8. When Insulated Bottles Lose Temperature Retention
Vacuum insulated bottles rely on an airless space between two walls.
If insulation performance decreases significantly:
8.1 Possible Vacuum Seal Failure
Signs:
- Exterior becomes warm when filled with hot liquid
- Bottle sweats when filled with cold drink
This usually indicates vacuum loss.
It cannot be repaired.
8.2 Lid Seal Issues
Sometimes temperature loss results from:
- Worn silicone ring
- Improperly tightened lid
Replacing seals may restore performance.
8.3 User Technique
For maximum insulation:
- Preheat with hot water before adding hot beverages
- Pre-cool with cold water before adding ice drinks
User behavior impacts performance.
9. Storage Best Practices
For long-term storage:
- Clean thoroughly
- Dry completely
- Store uncapped
- Avoid humid environments
- Keep away from extreme heat
Never store sealed if moisture remains inside.
10. Common Cleaning Mistakes
Avoid:
- Steel wool
- Bleach
- Abrasive cleaners
- Dishwasher use if manufacturer prohibits it
- Sealing bottle while damp
Maintenance errors often cause more damage than usage itself.
11. Tool Selection by Bottle Type
Narrow-Mouth Bottles
Require slim, long brushes.
Wide-Mouth Bottles
Easier access, but still require seal cleaning.
Straw Bottles
Mandatory straw brushes.
Kids Bottles
Gentle, non-toxic cleaning agents preferred.
Insulated Stainless Steel Bottles
Never use high heat or boiling directly unless specified.
Tool choice should match design structure.
12. When to Replace Parts or Entire Bottles
Consider replacement if:
- Severe interior scratching
- Persistent odor after multiple treatments
- Vacuum insulation failure
- Cracked plastic components
- Worn seals causing leakage
Reusable does not mean permanent.
Lifecycle awareness is part of responsible use.
Conclusion: Maintenance Protects Performance
Reusable water bottles are engineered for repeated use, but longevity depends on user habits.
A structured maintenance approach includes:
- Proper tools
- Regular cleaning cycles
- Correct drying practices
- Early problem detection
Cleaning protects hygiene.
Maintenance protects investment.
A well-maintained bottle delivers:
- Better taste
- Better insulation
- Longer service life
- Safer hydration
Water bottles are daily infrastructure.
Treat them accordingly.